Our quality products and best service will make your business much better.
Professional . Specialized . Experienced
(English)
14
Dec
.jpg)
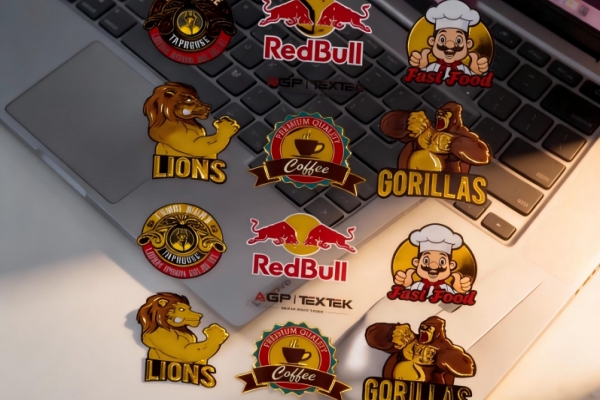
The ability to create intricate, durable metallic stickers has been revolutionized by integrating specialized film technology with standard flatbed or roll-to-roll UV Printers. This guide outlines the step-by-step process—often referred to as UV Foiling or Crystal Film Foiling—to create high-impact metallic foil transfers without requiring specialized DTF equipment.
This technique relies on the precise application of a specialized Foil Varnish (Hot Varnish) using a standard UV printer. This varnish serves a critical function: it acts as a selective, pressure-sensitive adhesive. The metallic foil will bond exclusively to the areas where this varnish is applied, allowing for digital control over the foiling process.
| Category | Component | Specification & Function |
| Printer | UV Printer (Flatbed or R2R) | Must have a dedicated printhead channel for Varnish/Clear ink. |
| Consumables | Specialized Foil Varnish | A thicker UV resin designed for high tack and strong bond with metallic foil. |
| Metallic Foil Roll/Sheets | The desired finish (e.g., Gold Iridescent, Silver, Holographic). | |
| A-Film (Print Film) | The initial receiving film onto which the varnish is printed. | |
| B-Film (Laminating Film) | The final film layer that makes the sticker transferable. | |
| Discharge Film (Tack Removal) | Essential for eliminating residual adhesive tack from the A-Film post-printing. | |
| Equipment | Laminator (Heat & Pressure) | Required for three separate lamination steps, necessitating precise temperature control. |
.jpg)
Accurate file preparation is paramount, utilizing the UV printer's specialized capabilities.
File Setup (Spot Channel): Isolate the design areas intended for foil and assign them to a dedicated Spot Channel (often labeled "Varnish" or "Clear" in the RIP software). The UV printer will only jet the Foil Varnish in these regions.
UV Lamp Calibration (Crucial): The curing level of the Foil Varnish must be perfectly controlled to achieve the required tackiness for the foil transfer.
Adjust the UV lamp intensity over the varnish head significantly higher than standard settings (e.g., 50% power or as specified by the varnish supplier) to ensure proper semi-cure for foil adhesion.
A-Film Loading: Peel the protective liner from the A-Film to expose the adhesive side. Load the A-Film onto the UV printer bed.
Printing: Print the design using the following sequence or configuration: (Optional Base Color) + Foil Varnish.
Note on Color: If you desire a specific tone (e.g., true gold, rose gold), a base layer of CMYK color (like yellow for gold) should be printed directly beneath the Foil Varnish layer to enhance the final metallic hue.
This step eliminates the non-printed residual tackiness on the A-Film surface that can trap dust or adhere to the foil incorrectly.
Laminator Setup (Discharge Film): Load the Discharge Film onto the laminator. Ensure the slightly sticky side of the Discharge Film faces the printed A-Film.
Temperature: Set the laminator to a low, controlled temperature (typically 40°C to 50°C).
Lamination and Peel: Run the printed A-Film and Discharge Film through the laminator.1 Upon peeling, the Discharge Film will remove the undesirable surface tack, leaving only the printed UV Varnish layer ready for the metallic foil.
The aesthetic transformation occurs as the foil selectively bonds to the printed Varnish.
Laminator Setup (Foil): Remove the Discharge Film and load the Metallic Foil roll. The active (bonding) side of the foil must face the A-Film.
Temperature: Increase the laminator temperature (e.g., e.g. raise to $90°C) to activate the foil's release properties.
Lamination: Pass the discharged A-Film through the laminator with the Metallic Foil.
Foil Reveal: Carefully peel the excess foil carrier away at a sharp angle. The metallic layer will have transferred only to the printed Foil Varnish, revealing the precise, detailed design.
The B-Film is applied to create the durable, transferable sticker medium.
Laminator Setup (B-Film): Replace the Metallic Foil with the B-Film (the final clear application layer).
Temperature: Increase the laminator temperature again (e.g., to 100 °C) for optimal B-Film bond.
Lamination: Run the A-Film (now foiled) through the laminator to bond it with the B-Film.
Finishing: The finished product is a composite film (A-Film backing + Foil Varnish + B-Film top). The sticker is now ready to be cut and applied to its final substrate (e.g., metal, glass, plastic, or product packaging).
This process requires tight control over temperature and materials during the three critical lamination steps:
| Step | Film Used | Laminator Temperature | Purpose |
| Stage 2: Discharge | Discharge Film | 40°C ~50°C | Removes residual tackiness from the A-Film. |
| Stage 3: Foiling | Metallic Foil | ~90°C | Transfers a metallic layer selectively to the UV Varnish. |
| Stage 4: Final Transfer | B-Film | ~100°C | Applies the durable, transferable B-Film layer. |
This UV Foiling technique provides a cost-effective, high-detail method to achieve luxury metallic finishes in a digital printing environment.


