
Our quality products and best service will make your business much better.
Professional . Specialized . Experienced
(English)

17
Aug
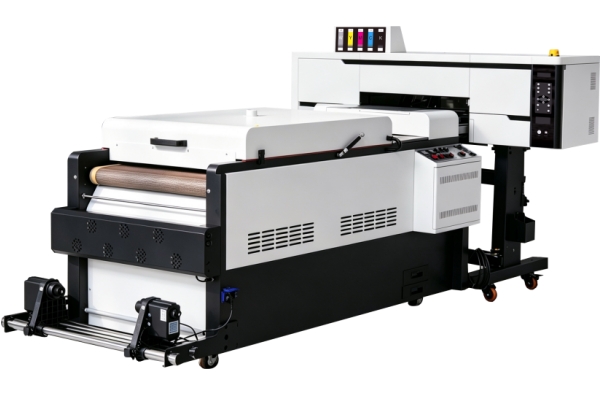
Quick answer: The most common DTF printer problems — white ink clogging, color banding, faded prints, transfers cracking after washing, and colors not matching the screen — all have specific, fixable root causes. This guide walks through each problem with a precise diagnosis method, a step-by-step fix, and a prevention protocol so the same issue does not come back.
Before troubleshooting any specific issue, it helps to understand why DTF printers are more maintenance-intensive than standard desktop inkjet printers. There are three structural reasons:
White ink contains titanium dioxide (TiO₂). Unlike CMYK pigment inks, white DTF ink is loaded with titanium dioxide particles — a dense, heavy mineral pigment that begins settling out of suspension within minutes of the ink sitting still. Settled TiO₂ thickens at the bottom of tanks and ink lines, progressively restricting flow until nozzles partially or fully clog. No other consumer inkjet ink behaves this way. Every DTF white ink management problem traces back to this single physical property.
DTF printing is a multi-stage process with five failure points. A standard inkjet printer has one job: put ink on paper. A DTF workflow has five sequential stages — printing, powder application, curing, heat pressing, and washing — and a defect at any stage produces a failed transfer. This means troubleshooting requires identifying which stage introduced the problem, not just adjusting the printer.
DTF printers run at the edge of their operational parameters. The combination of high white ink density, large ink coverage areas, and the need for precise color layering (CMYK under white, or white under CMYK depending on the RIP settings) means DTF printers operate with less tolerance for environmental variation than general inkjet printers. Temperature, humidity, ink agitation, and print head height all affect output quality in ways that would be invisible on a standard printer.
With this context, here is a systematic guide to the ten most-searched DTF printing problems — each with its root cause, diagnostic test, and fix.
Root cause: Titanium dioxide pigment in white ink settles out of suspension when the printer is idle, forming a gel-like sediment in ink lines, dampers, and printhead nozzles. Clogs can begin forming within 15–30 minutes of the printer being idle in a warm or low-humidity environment.
How to diagnose it: Print a nozzle check pattern. Missing segments in the white channel — or a white channel that prints faint and streaky rather than solid — confirm a white ink clog. If the color channels (CMYK) are clean but white is missing, the problem is white-ink-specific and does not require printhead replacement.
Step-by-step fix:
Prevention: Agitate the white ink cartridge or tank gently every day — even on non-printing days. Run a nozzle check every morning before the first production print. If the printer will be idle for more than 48 hours, run a white channel purge and refill to move fresh, suspended ink into the lines before shutdown. Never leave white ink sitting static in the lines for more than 12 hours without agitation.
Root cause: Horizontal banding — repeating light or dark stripes running across the print — has four possible causes, and identifying which one applies determines the correct fix. The four causes are: (1) partially clogged nozzles in one or more channels, (2) incorrect media advance (the printer is feeding film in uneven increments), (3) air bubbles in the ink supply lines, or (4) a damaged or worn wiper blade leaving ink residue on the printhead face.
How to diagnose the cause:
Environment factor: Low humidity (below 40% RH) increases ink evaporation rate at the nozzle face between print passes, contributing to partial nozzle blockage that causes banding. If banding is worse in winter or in air-conditioned environments, maintain room humidity at 45–60% RH using a humidifier near (but not directly over) the printer.
Root cause: Color mismatch between screen and final DTF print is almost always caused by one of three issues: (1) no ICC profile installed for the specific ink-film-printer combination, (2) the monitor is uncalibrated and displaying colors inaccurately, or (3) the RIP software color management settings are incorrect or conflicting with design software color settings.
The RGB-to-CMYK gap: Computer monitors display color in RGB (additive light), which can show colors that CMYK ink physically cannot reproduce. Vivid neon colors, highly saturated blues, and certain greens are common examples. No amount of ICC profile adjustment will make a DTF printer reproduce a color that falls outside the CMYK gamut. Enable gamut warning in your design software (Photoshop: View → Gamut Warning) to identify these colors before printing and substitute them with in-gamut alternatives.
Step-by-step fix:
White ink underbase and color: Every DTF color channel is printed on top of the white ink underbase (or below it, depending on film orientation and RIP settings). If the white ink underbase is too thin, colors on dark garments appear dull and washed out. If it is too thick, colors appear slightly desaturated and the transfer feels stiff. Adjust white ink density (white limit) in the RIP software in 5% increments and compare test prints to find the optimal balance for your fabric weight.
Root cause: Post-wash cracking and peeling is caused by incomplete adhesive bonding at either the curing stage or the heat-press stage — not by the transfer itself being defective. The four specific causes are: (1) hot melt powder under-cured in the oven, (2) heat press temperature too low, (3) insufficient heat press dwell time (especially on thick fabrics), or (4) incorrect washing (too hot, wrong side out, fabric softener).
How to identify which stage caused the problem:
The definitive pre-production test: Before committing to a production run on any new fabric or powder combination, press two test transfers, wait 30 minutes, then perform a tape adhesion test (apply masking tape firmly over the design, press with a thumbnail, peel briskly — no ink should transfer to the tape). If any ink lifts, recheck your press parameters before running the order.
Root cause: Uneven white ink coverage — where some areas of the white underbase are dense and opaque while others are thin or missing — has three possible causes: (1) partially clogged white nozzles (the most common cause), (2) insufficient white ink density setting in the RIP software, or (3) inconsistent ink supply caused by settled white ink in the supply line or sub-tank.
Why this matters: The white ink underbase is the foundation of every DTF transfer on a dark garment. Areas where white ink coverage is thin or missing will show the dark fabric color through the transfer, making the design look faded, discolored, or patchy — even if all other parameters are correct. A faded or patchy white layer cannot be corrected at the heat-press stage.
Fix sequence:
Root cause: DTF PET film feeding problems — where the film skews sideways, jams in the feed path, or slips causing uneven media advance — are almost always caused by one of three things: (1) film loaded on the wrong side (printing on the non-coated surface), (2) film roll tension incorrect (too loose or too tight), or (3) accumulation of powder residue or dried ink on the pinch rollers.
Printed-on-wrong-side test: Lightly touch the tip of a damp finger to each side of the film. The coated print side will feel slightly more tacky or will absorb moisture faster. Printing on the wrong side causes ink to sit on the surface rather than absorb — producing smearing, bleed, and feeding inconsistencies because the ink does not adhere properly to the smooth non-coated surface.
Fix for roller contamination: Power off the printer, manually advance the film to expose the pinch rollers, and clean each roller with a lint-free cloth lightly dampened with isopropyl alcohol. Allow to dry completely before reloading film. Powder-contaminated rollers are a common cause of irregular media advance that produces banding even when the printhead and nozzles are perfectly clean.
Fix for skewing: Reload the film roll with the roll core perfectly centered on the feed spindle. Use the film guide markers on the printer's media feed path to align the film edges. If skewing persists after correct loading, inspect the feed guide rails for damage or debris.
Root cause: Ink bleeding — where color edges appear fuzzy, blurred, or have a soft halo around them — is caused by one of four issues: (1) total ink limit set too high in the RIP software, (2) film moisture absorption causing ink to spread on contact, (3) incorrect print head height causing ink droplets to spread in flight before reaching the film, or (4) printing at too high a humidity level.
Total ink limit fix: In your RIP software, find the Total Ink Limit (TIL) setting. Standard DTF setups typically run 180–220% TIL (the sum of all channel ink percentages). If TIL is set above 250%, ink volume per pass exceeds what the film coating can absorb, and excess ink spreads laterally before curing — producing bleed. Reduce TIL in 10% increments and compare test prints until bleeding stops.
Film moisture fix: DTF PET film is hygroscopic — it absorbs moisture from the air. Film stored in an unsealed environment in a humid room can absorb enough moisture that ink spread on the film surface rather than being absorbed into the coating. Store film in its original sealed packaging or an airtight roll sleeve. If suspected moisture is the cause, load a fresh roll from sealed stock and compare.
Print head height check: DTF printers have an adjustable head height setting to accommodate different film thicknesses. If the head is set too high for the film being used, ink droplets travel further before hitting the film and spread wider on impact — producing blurry edges and overspray. Set head height to the minimum safe clearance above the film surface per your printer's specifications.
Root cause: Unexpectedly slow print speeds in DTF printing are almost always caused by one of three settings issues: (1) resolution set too high for production (12-pass or higher when 8-pass is sufficient for most garment work), (2) white ink double-pass enabled when it is not needed for the specific fabric color, or (3) RIP software set to process one job at a time rather than using parallel processing queues.
Resolution vs. speed trade-off for DTF: Most DTF garment decoration work looks excellent at 720×1440 dpi (6-pass) or 720×2400 dpi (8-pass). Moving to 720×3600 dpi (12-pass) increases print time by 33–50% with no visible quality improvement on standard t-shirts at normal viewing distance. Reserve 12-pass for fine-detail artwork (small text under 8pt, photographic portraits) where the increased resolution is actually visible.
RIP processing settings: Verify in your RIP software that RIP processing (rendering the design file into print data) is set to run in parallel with printing where the software supports it. Some RIP configurations process the entire file before starting the printer, then print — effectively doubling production time on large files. Enable "print and cut" or "print while RIPing" mode if available.
Root cause: A transfer that looks visually correct but peels off the fabric immediately after pressing — with no bonding at all — is almost always caused by one of two specific problems: (1) the heat press temperature is far below the minimum required to activate the TPU adhesive (below 140°C at the film surface), or (2) the wrong side of the DTF film was pressed (the transfer was applied with the ink layer facing up rather than down against the fabric).
Temperature verification: The single most important step before troubleshooting any adhesion problem is to verify actual heat press temperature at the platen surface with an infrared thermometer — not by trusting the press display. Budget and mid-range heat presses routinely read 10–25°C above actual temperature. A press displaying 165°C may only be reaching 140–145°C at the platen — right at the minimum threshold for TPU activation. If actual temperature is below 155°C, the powder will not melt fully and adhesion will be minimal to zero.
Transfer orientation check: A DTF transfer should be pressed with the printed ink side facing down against the fabric. If pressed the wrong way (ink side up, powder side against the platen), the heat melts the powder into the press rather than the fabric — the transfer peels cleanly with no adhesion. This error is most common when operators are new to DTF or when working with transfers that were produced by a third party and the orientation is not clearly marked.
Root cause: Mid-job stops and error codes in DTF printers have five common causes: (1) ink level sensor triggering on a low white ink cartridge, (2) waste ink pad (waste ink counter) reaching its limit, (3) film roll running out or jamming mid-job, (4) USB or network connection dropping, or (5) a memory/processing error in the RIP software.
White ink level trigger: DTF printers often have conservative ink-low thresholds that stop printing before the cartridge is physically empty. This is particularly common with the white ink channel, which is monitored more aggressively because running dry mid-print destroys the underbase of in-progress designs. Monitor white ink level before starting any job that will take more than 30 minutes, and top up if the level is below 30%.
Waste ink counter: Epson-based DTF printers track waste ink pad usage and lock the printer when the counter reaches 100% — even if the physical pad is not actually full. Reset the waste ink counter using the printer manufacturer's maintenance utility (or a third-party utility such as WICReset for Epson-based machines), and physically inspect and replace the waste ink pad if it is saturated.
RIP software memory errors: Large, high-resolution DTF files (A4+ at 1440 dpi with full white coverage) can consume 2–4 GB of RAM during RIP processing. If the computer running the RIP software has less than 8 GB RAM available, mid-job memory errors are likely on large files. Upgrade RAM to 16 GB minimum for stable production DTF operation, or reduce file resolution to 720 dpi for standard garment work.
Use this table to identify your problem by symptom and get directly to the root cause and fix without reading the full guide.
| Symptom You See | Most Likely Root Cause | First Fix to Try | If First Fix Fails |
|---|---|---|---|
| White stripes or missing white areas in print | White nozzle clog (TiO₂ settlement) | Nozzle check + 1–2 cleaning cycles | Manual cap-station clean + flush |
| Horizontal color stripes across full print | Partial nozzle clog OR media advance error | Nozzle check — if clean, run media advance calibration | Wiper blade clean or replacement |
| Colors look wrong vs. screen | Missing/wrong ICC profile OR uncalibrated monitor | Install manufacturer ICC profile in RIP; set color management to "Managed by RIP" | Calibrate monitor; print color reference chart |
| Transfer cracks after first wash | Under-cured hot melt powder | Verify curing oven temp with thermometer; reduce conveyor speed | Replace powder batch; retest |
| Transfer edges peel after 3–5 washes | Heat press temp too low or dwell too short | Verify platen temp with IR thermometer; target 160–170°C, 12–15 sec | Use silicone pad to improve heat distribution on thick fabrics |
| Transfer cracks on stretch fabric | Standard TPU powder on high-stretch fabric | Switch to high-elasticity TPU powder (300%+ elongation rating) | Use stretch-rated DTF film |
| White underbase uneven / patchy | Partial white nozzle clog OR settled ink in supply line | Nozzle check + cleaning; agitate white ink supply | Increase white ink density in RIP; enable double white pass |
| Film skewing or jamming in feed path | Wrong film side loaded OR contaminated pinch rollers | Verify coated side faces printhead; clean rollers with IPA | Adjust roll tension; inspect guide rails |
| Fuzzy edges / ink bleeding | Total ink limit too high OR film moisture absorption | Reduce Total Ink Limit by 10–20% in RIP software | Load fresh sealed film; reduce head height |
| Zero adhesion — transfer peels off immediately | Heat press too cold OR transfer applied wrong-side-up | Verify platen temperature with IR thermometer | Check transfer orientation (ink side must face fabric) |
| Print stops mid-job with error | Low white ink / waste ink counter full / RIP memory error | Check ink levels; reset waste ink counter | Upgrade RIP computer RAM to 16 GB minimum |
| Print speed much slower than spec | Resolution set too high (12-pass) OR RIP not processing in parallel | Reduce to 8-pass (720×2400 dpi) for standard garment work | Enable "print while RIPing" mode in RIP software |
Eighty percent of DTF printer problems are preventable with a consistent daily maintenance routine. Studies of DTF production environments consistently show that printhead failures, white ink clogs, and color inconsistencies are dramatically less frequent in shops that follow a daily protocol versus those that only perform maintenance reactively when problems appear.
Every day before printing:
Every week:
Every month:
Why does my DTF white ink clog so fast even when I clean the printhead regularly?
Frequent clogging despite regular cleaning usually means the white ink is not being agitated enough between print sessions. Cleaning cycles flush the printhead but do not prevent settlement in the ink supply lines and sub-tanks between print sessions. Titanium dioxide can settle and partially solidify in as little as 15 minutes in a static system. The fix is agitation — not more cleaning. Enable your printer's white ink circulation or stirring function if available, and manually agitate white ink cartridges at the start of every day. If your printer has a bulk ink system without circulation, consider the upgrade to a circulating ink delivery system for the white channel specifically.
My DTF colors are accurate on light shirts but wrong on dark shirts — what is different?
On dark shirts, every color is printed on top of the white ink underbase. If the white underbase is not fully opaque — because white ink density is too low, white nozzles are partially clogged, or the white layer is too thin — the dark fabric color shows through and shifts all the CMYK colors on top. Check your white ink nozzle status, increase white ink density to 85–100% in your RIP for dark garments, and consider enabling a double white pass. On light shirts, CMYK ink goes directly on the film without a full white base, so the color rendering is more consistent and easier to profile accurately.
How many wash cycles should a DTF transfer survive before peeling?
A correctly produced DTF transfer — using quality TPU hot melt powder, correct curing parameters (110–130°C oven, 2–3 minutes), correct heat press parameters (160–170°C, 12–15 seconds, medium-firm pressure), and washed inside-out at 40°C maximum — should survive a minimum of 40 wash cycles before showing any edge wear. Many quality transfers last 60+ cycles. If your transfers are peeling before 20 wash cycles under correct care conditions, the problem is a production parameter or material quality issue — not normal wear. Recheck curing oven temperature and heat press temperature with a calibrated thermometer as the first step.
What is the correct temperature and pressure for a DTF heat press?
The standard parameters for most DTF transfers on standard t-shirt fabrics are: 160–170°C platen temperature (verified with infrared thermometer, not press display), 12–15 seconds dwell time, medium-to-firm pressure. Increase dwell time to 16–20 seconds for thick fabrics (hoodies, denim, canvas). Reduce temperature to 155–160°C for heat-sensitive synthetic fabrics. Always perform a small test press on a scrap piece of the target fabric before pressing a full customer order when changing fabric types.
Can I use DTF transfers on any fabric?
Standard DTF hot melt powder transfers work on virtually all fabric types — cotton, polyester, nylon, denim, canvas, rayon, and blends — without pretreatment. For high-stretch fabrics (spandex, lycra, compression knits containing more than 10% elastane), use high-elasticity TPU powder rated for 300%+ elongation. Standard powder on high-stretch fabric will crack along the stretch direction after a few wears. DTF transfers are not suitable for non-fabric hard surfaces — for glass, metal, ceramic, plastic, and similar materials, UV DTF crystal label printing is the correct process.
My DTF printer has not been used for two weeks. What should I do before printing again?
Do not print immediately after extended idle periods. Follow this recovery sequence: (1) gently agitate all ink cartridges, especially white, for 30–60 seconds each; (2) run two medium head-cleaning cycles with a 10-minute wait between them to allow cleaning solution to soften any dried ink; (3) print a nozzle check and inspect all five channels; (4) if nozzle gaps persist in the white channel, perform a manual cap-station clean before running additional cleaning cycles; (5) only begin production printing after a clean, gap-free nozzle check confirms all channels are fully operational.
DTF printing problems are predictable and fixable — but they require diagnosing the correct stage of the process before applying a fix. The most productive troubleshooting mindset is:
For Textek DTF printer technical support, spare parts, consumables (DTF pigment ink, TPU hot melt powder, DTF PET film), and replacement components including dampers and cap station parts, visit textek.cn or contact the technical support team at info@textek.cn.


